Publicado el

Instalar ISPConfig 3.1 en Linux

Instalar-ISPConfig3.1

Se debe descargar la versión actual de ISPConfig e instalarla. El instalador configurará todos los servicios como Postfix, Dovecot, etc., sin necesidad de una configuración manual.

A su vez, se tiene la posibilidad de que se genere un certificado para acceder al panel del vhost del ISPConfig (con https), para que esto se haga debe presionarse [ENTER] cuando salga la pregunta:

Do you want a secure (SSL) connection to the ISPConfig web interface (y,n) [y]:

Para instalar la version más reciente del ISPConfig debemos ejecutar:

cd /tmp
wget -O ispconfig.tar.gz https://git.ispconfig.org/ispconfig/ispconfig3/repository/archive.tar.gz?ref=stable-3.1
tar xfz ispconfig.tar.gz
cd ispconfig3*/install/

Y luego ejecutar:

php -q install.php

Y se presentarán las siguientes preguntas a las cuales debemos responder lo indicado:

# php -q install.php

--------------------------------------------------------------------------------
_____ ___________ _____ __ _ ____
|_ _/ ___| ___ \ / __ \ / _(_) /__ \
| | \ `--.| |_/ / | / \/ ___ _ __ | |_ _ __ _ _/ /
| | `--. \ __/ | | / _ \| `_ \| _| |/ _` | |_ |
_| |_/\__/ / | | \__/\ (_) | | | | | | | (_| | ___\ \
\___/\____/\_| \____/\___/|_| |_|_| |_|\__, | \____/
__/ |
|___/
--------------------------------------------------------------------------------


>> Initial configuration

Operating System: CentOS 7.3

Following will be a few questions for primary configuration so be careful.
Default values are in [brackets] and can be accepted with <enter>.
Tap in "quit" (without the quotes) to stop the installer.


Select language (en,de) [en]: [PRESIONE ENTER]

Installation mode (standard,expert) [standard]: [PRESIONE ENTER]

Full qualified hostname (FQDN) of the server, eg server1.domain.tld [server1.canomi.com]: [PRESIONE ENTER]

MySQL server hostname [localhost]: [PRESIONE ENTER]

MySQL server port [3306]: [PRESIONE ENTER]

MySQL root username [root]: [PRESIONE ENTER]

MySQL root password []: [INTRODUZCA SU CLAVE ROOT DE MYSQL]

MySQL database to create [dbispconfig]: [PRESIONE ENTER]

MySQL charset [utf8]: [PRESIONE ENTER]

Configuring Postgrey
Configuring Postfix
Generating a 4096 bit RSA private key
.......................................................................++
........................................................................................................................................++
writing new private key to 'smtpd.key'
-----
You are about to be asked to enter information that will be incorporated
into your certificate request.
What you are about to enter is what is called a Distinguished Name or a DN.
There are quite a few fields but you can leave some blank
For some fields there will be a default value,
If you enter '.', the field will be left blank.
-----
Country Name (2 letter code) [AU]: [INTRODUZCA EL CÓDIGO DE PAIS DE 2 LETRAS]
State or Province Name (full name) [Some-State]: [INTRODUZCA EL NOMBRE DEL ESTADO]
Locality Name (eg, city) []: [INTRODUZCA SU CIUDAD]
Organization Name (eg, company) [Internet Widgits Pty Ltd]: [INTRODUZCA EL NOMBRE DE LA EMPRESA O PRESIONE ENTER]
Organizational Unit Name (eg, section) []: [PRESIONE ENTER]
Common Name (e.g. server FQDN or YOUR name) []: [INTRODUZCA EL NOMBRE DEL SERVIDOR: desarrolloN.local]
Email Address []: [PRESIONE ENTER]
Configuring Mailman
Configuring Dovecot
Configuring Spamassassin
Configuring Amavisd
Configuring Getmail
Configuring BIND
Configuring Jailkit
Configuring Pureftpd
Configuring Apache
Configuring vlogger
Configuring Bastille Firewall

Configuring Fail2ban
[INFO] service OpenVZ not detected
Configuring Apps vhost
Installing ISPConfig
ISPConfig Port [8080]:

Admin password [admin]:

Do you want a secure (SSL) connection to the ISPConfig web interface (y,n) [y]: [PRESIONE ENTER]

Generating RSA private key, 4096 bit long modulus
.......................++
................................................................................................................................++
e is 65537 (0x10001)
You are about to be asked to enter information that will be incorporated
into your certificate request.
What you are about to enter is what is called a Distinguished Name or a DN.
There are quite a few fields but you can leave some blank
For some fields there will be a default value,
If you enter '.', the field will be left blank.
-----
Country Name (2 letter code) [AU]: [INTRODUZCA EL CÓDIGO DE PAIS DE 2 LETRAS]
State or Province Name (full name) [Some-State]: [INTRODUZCA EL NOMBRE DEL ESTADO]
Locality Name (eg, city) []: [INTRODUZCA SU CIUDAD]
Organization Name (eg, company) [Internet Widgits Pty Ltd]: [INTRODUZCA EL NOMBRE DE LA EMPRESA O PRESIONE ENTER]
Organizational Unit Name (eg, section) []: [PRESIONE ENTER]
Common Name (e.g. server FQDN or YOUR name) []: [INTRODUZCA EL NOMBRE DEL SERVIDOR: desarrolloN.local]
Email Address []: [PRESIONE ENTER]

Please enter the following 'extra' attributes
to be sent with your certificate request
A challenge password []: [PRESIONE ENTER]
An optional company name []: [PRESIONE ENTER]
writing RSA key


Configuring DBServer
Installing ISPConfig crontab
no crontab for root
no crontab for getmail
Detect IP addresses
Restarting services ...
Installation completed.</enter>

El instalador configura automáticamente todos los servicios subyacentes, por lo que no se necesita ninguna configuración manual.

Primer ingreso a ISPConfig

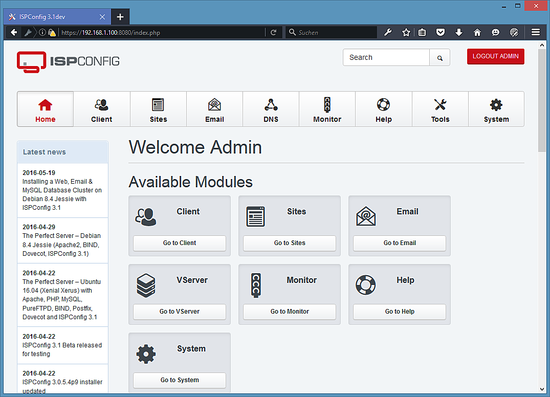
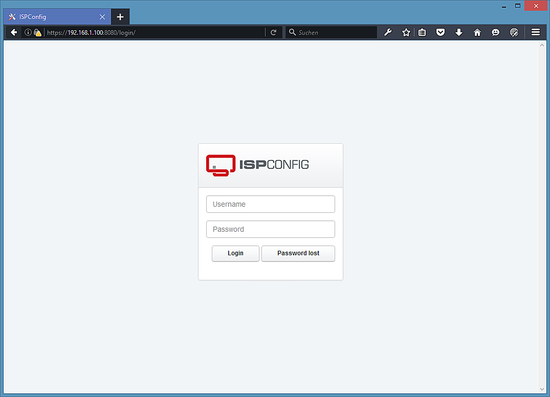
Ahora puede acceder a ISPConfig 3.1 por el navegador usando: http://desarrolloN.local:8080/ o http://192.168.0.X:8080/ (http o https depende de lo que haya elegido durante la instalación). Recuerde que la N es el número escogido desde el inicio para el servidor y la X es la IP que le corresponda.
Inicie sesión con el nombre de usuario admin y la contraseña admin (debe cambiar la contraseña predeterminada después de su primer inicio de sesión):

Publicado el

Instalar Roundcube webmail en Linux

instalar-roundcube-webmail

Para instalar el cliente RoundCube webmail se debe ejecutar:

yum -y install roundcubemail

Cambie el archivo de configuración roundcubemail.conf de la siguiente manera:

nano /etc/httpd/conf.d/roundcubemail.conf

Debería quedar de la siguiente forma:

#
# Round Cube Webmail is a browser-based multilingual IMAP client
#

Alias /roundcubemail /usr/share/roundcubemail
Alias /webmail /usr/share/roundcubemail

# Define who can access the Webmail
# You can enlarge permissions once configured

#<Directory /usr/share/roundcubemail/>
#    <IfModule mod_authz_core.c>
#        # Apache 2.4
#        Require local
#    </IfModule>
#    <IfModule !mod_authz_core.c>
#        # Apache 2.2
#        Order Deny,Allow
#        Deny from all
#        Allow from 127.0.0.1
#        Allow from ::1
#    </IfModule>
#</Directory>

<Directory /usr/share/roundcubemail/>
        Options none
        AllowOverride Limit
        Require all granted
</Directory>

# Define who can access the installer
# keep this secured once configured

#<Directory /usr/share/roundcubemail/installer/>
#    <IfModule mod_authz_core.c>
#        # Apache 2.4
#        Require local
#    </IfModule>
#    <IfModule !mod_authz_core.c>
#        # Apache 2.2
#        Order Deny,Allow
#        Deny from all
#        Allow from 127.0.0.1
#        Allow from ::1
#    </IfModule>
#</Directory>

<Directory /usr/share/roundcubemail/installer>
        Options none
        AllowOverride Limit
        Require all granted
</Directory>


# Those directories should not be viewed by Web clients.
<Directory /usr/share/roundcubemail/bin/>
    Order Allow,Deny
    Deny from all
</Directory>
<Directory /usr/share/roundcubemail/plugins/enigma/home/>
    Order Allow,Deny
    Deny from all
</Directory>

Reniciar apache

systemctl restart httpd.service

Ahora necesitamos una base de datos para el correo RoundCube, lo inicializaremos de la siguiente manera:

mysql -u root -p

En el cursor de MariaDB debemos usar:

CREATE DATABASE roundcubedb;
CREATE USER roundcubeuser@localhost IDENTIFIED BY 'roundcubepassword';
GRANT ALL PRIVILEGES on roundcubedb.* to roundcubeuser@localhost ;
FLUSH PRIVILEGES;
exit

Estamos utilizando los detalles de la base de datos RoundCube como un ejemplo, por favor reemplace los valores según su elección por razones de seguridad.

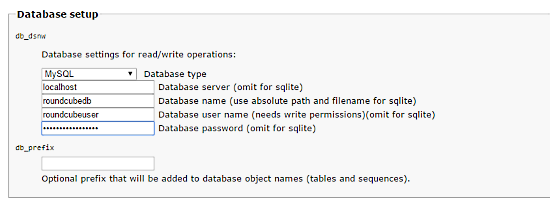
Ahora instalaremos RoundCube en el navegador en http://192.168.1.N/roundcubemail/installer (donde N es la IP que hemos configurado)

Ahora complete las entradas para la configuración:

nano /etc/roundcubemail/config.inc.php

El archivo debe quedar como lo siguiente:

<?php

/* Local configuration for Roundcube Webmail */

// ----------------------------------
// SQL DATABASE
// ----------------------------------
// Database connection string (DSN) for read+write operations
// Format (compatible with PEAR MDB2): db_provider://user:password@host/database
// Currently supported db_providers: mysql, pgsql, sqlite, mssql or sqlsrv
// For examples see http://pear.php.net/manual/en/package.database.mdb2.intro-dsn.php
// NOTE: for SQLite use absolute path: 'sqlite:////full/path/to/sqlite.db?mode=0646'
$config['db_dsnw'] = 'mysql://roundcubeuser:roundcubepassword@localhost/roundcubedb';

// ----------------------------------
// IMAP
// ----------------------------------
// The mail host chosen to perform the log-in.
// Leave blank to show a textbox at login, give a list of hosts
// to display a pulldown menu or set one host as string.
// To use SSL/TLS connection, enter hostname with prefix ssl:// or tls://
// Supported replacement variables:
// %n - hostname ($_SERVER['SERVER_NAME'])
// %t - hostname without the first part
// %d - domain (http hostname $_SERVER['HTTP_HOST'] without the first part)
// %s - domain name after the '@' from e-mail address provided at login screen
// For example %n = mail.domain.tld, %t = domain.tld
// WARNING: After hostname change update of mail_host column in users table is
//          required to match old user data records with the new host.
$config['default_host'] = 'localhost';

// provide an URL where a user can get support for this Roundcube installation
// PLEASE DO NOT LINK TO THE ROUNDCUBE.NET WEBSITE HERE!
$config['support_url'] = '';

// this key is used to encrypt the users imap password which is stored
// in the session record (and the client cookie if remember password is enabled).
// please provide a string of exactly 24 chars.
$config['des_key'] = 'FHgaM7ihtMkM1cBwckOcxPdT';

// ----------------------------------
// PLUGINS
// ----------------------------------
// List of active plugins (in plugins/ directory)
$config['plugins'] = array();

// Set the spell checking engine. Possible values:
// - 'googie'  - the default
// - 'pspell'  - requires the PHP Pspell module and aspell installed
// - 'enchant' - requires the PHP Enchant module
// - 'atd'     - install your own After the Deadline server or check with the people at http://www.afterthedeadline.com before using their API
// Since Google shut down their public spell checking service, you need to
// connect to a Nox Spell Server when using 'googie' here. Therefore specify the 'spellcheck_uri'
$config['spellcheck_engine'] = 'pspell';

A continuación, presione el botón “continuar” en el instalador web. En la siguiente página, presione el botón “Inicializar base de datos”.
Finalmente, deshabilite el instalador de Roundecubemail. Cambie el archivo de configuración de apache roundcubemail.conf:

nano /etc/httpd/conf.d/roundcubemail.conf

El archivo debe quedar de la siguiente forma:

#
# Round Cube Webmail is a browser-based multilingual IMAP client
#

Alias /roundcubemail /usr/share/roundcubemail
Alias /webmail /usr/share/roundcubemail

# Define who can access the Webmail
# You can enlarge permissions once configured

#<Directory /usr/share/roundcubemail/>
#    <IfModule mod_authz_core.c>
#        # Apache 2.4
#        Require local
#    </IfModule>
#    <IfModule !mod_authz_core.c>
#       # Apache 2.2
#        Order Deny,Allow
#        Deny from all
#        Allow from 127.0.0.1
#        Allow from ::1
#    </IfModule>
#</Directory>

<Directory /usr/share/roundcubemail/>
        Options none
        AllowOverride Limit
        Require all granted
</Directory>

# Define who can access the installer
# keep this secured once configured

<Directory /usr/share/roundcubemail/installer/>
    <IfModule mod_authz_core.c>
        # Apache 2.4
       Require local
   </IfModule>
    <IfModule !mod_authz_core.c>
        # Apache 2.2
        Order Deny,Allow
        Deny from all
       Allow from 127.0.0.1
        Allow from ::1
    </IfModule>
</Directory>

# Those directories should not be viewed by Web clients.
<Directory /usr/share/roundcubemail/bin/>
    Order Allow,Deny
    Deny from all
</Directory>
<Directory /usr/share/roundcubemail/plugins/enigma/home/>
    Order Allow,Deny
    Deny from all
</Directory>

Reiniciar Apache:

systemctl restart httpd.service

Ahora es posible ingresar al webmail por:

http://desarrolloN/webmail ó http://192.168.1.N/webmail

Publicado el

Instalar Mailman en Linux

Instalar-Mailman

Si quiere administrar listas de correo con Mailman en su servidor, entonces instale mailman ahora. Mailman es compatible con ISPConfig, por lo que será capaz de crear nuevas listas de correo a través de ISPConfig más tarde.

Para instalarlo debemos ejecutar

yum -y install mailman

Antes de poder arrancar mailman debemos crear la primera lista de correo denominada mailman:

touch /var/lib/mailman/data/aliases
postmap /var/lib/mailman/data/aliases
/usr/lib/mailman/bin/newlist mailman
ln -s /usr/lib/mailman/mail/mailman /usr/bin/mailman

Esto preguntará algunos parámetros como sigue:

[root@desarrolloN tmp]# /usr/lib/mailman/bin/newlist mailman
Enter the email of the person running the list: [EMAIL DEL RESPONSABLE DEL SERVIDOR]
Initial mailman password: [CONTRASEÑA A ASIGNAR]
To finish creating your mailing list, you must edit your /etc/aliases (or
equivalent) file by adding the following lines, and possibly running the
'newaliases' program:

## mailman mailing list
mailman:              "|/usr/lib/mailman/mail/mailman post mailman"
mailman-admin:        "|/usr/lib/mailman/mail/mailman admin mailman"
mailman-bounces:      "|/usr/lib/mailman/mail/mailman bounces mailman"
mailman-confirm:      "|/usr/lib/mailman/mail/mailman confirm mailman"
mailman-join:         "|/usr/lib/mailman/mail/mailman join mailman"
mailman-leave:        "|/usr/lib/mailman/mail/mailman leave mailman"
mailman-owner:        "|/usr/lib/mailman/mail/mailman owner mailman"
mailman-request:      "|/usr/lib/mailman/mail/mailman request mailman"
mailman-subscribe:    "|/usr/lib/mailman/mail/mailman subscribe mailman"
mailman-unsubscribe:  "|/usr/lib/mailman/mail/mailman unsubscribe mailman"

Hit enter to notify mailman owner... [ENTER]

[root@desarrollon tmp]#

Luego debemos abrir /etc/aliases:

nano /etc/aliases

Y agregar las líneas siguientes:

[...]
mailman:              "|/usr/lib/mailman/mail/mailman post mailman"
mailman-admin:        "|/usr/lib/mailman/mail/mailman admin mailman"
mailman-bounces:      "|/usr/lib/mailman/mail/mailman bounces mailman"
mailman-confirm:      "|/usr/lib/mailman/mail/mailman confirm mailman"
mailman-join:         "|/usr/lib/mailman/mail/mailman join mailman"
mailman-leave:        "|/usr/lib/mailman/mail/mailman leave mailman"
mailman-owner:        "|/usr/lib/mailman/mail/mailman owner mailman"
mailman-request:      "|/usr/lib/mailman/mail/mailman request mailman"
mailman-subscribe:    "|/usr/lib/mailman/mail/mailman subscribe mailman"
mailman-unsubscribe:  "|/usr/lib/mailman/mail/mailman unsubscribe mailman"

Ahora ejecutamos:

newaliases

Y luego reiniciamos Postfix con:

systemctl restart postfix.service

Ahora abrimos el archivo de configuración del mailman para el Apache:

nano /etc/httpd/conf.d/mailman.conf

Y:

Agregamos la línea:

ScriptAlias /cgi-bin/mailman/ /usr/lib/mailman/cgi-bin/

Comentamos la línea

Alias /pipermail/ /var/lib/mailman/archives/public/

Agregamos la línea

Alias /pipermail /var/lib/mailman/archives/public/

Quedando como:

#
#  httpd configuration settings for use with mailman.
#

ScriptAlias /mailman/ /usr/lib/mailman/cgi-bin/
ScriptAlias /cgi-bin/mailman/ /usr/lib/mailman/cgi-bin/
<Directory /usr/lib/mailman/cgi-bin/>
    AllowOverride None
    Options ExecCGI
    Order allow,deny
    Allow from all
</Directory>


#Alias /pipermail/ /var/lib/mailman/archives/public/
Alias /pipermail /var/lib/mailman/archives/public/
<Directory /var/lib/mailman/archives/public>
    Options Indexes MultiViews FollowSymLinks
    AllowOverride None
    Order allow,deny
    Allow from all
    AddDefaultCharset Off
</Directory>

# Uncomment the following line, to redirect queries to /mailman to the
# listinfo page (recommended).

# RedirectMatch ^/mailman[/]*$ /mailman/listinfo

Ahora reiniciamos el Apache:

systemctl restart httpd.service

Y finalmente debemos colocar los enlaces para el arranque del sistema e iniciar el mailman:

systemctl enable mailman.service
systemctl start mailman.service

Después de haber instalado el ISPConfig se puede acceder al Mailman de la siguiente forma:

Se puede usar el alias /cgi-bin/mailman para todos los virtual hosts del Apache (Nota: Para poder usar mailman en un vhost se deben deshabilitar suExec y CGI) de tal forma que se puede acceder vía web al administrador del mailman usando:

http://<virtual_host>/cgi-bin/mailman/admin/<nombre_lista>

y a la página del usuario usando:

http://<virtual_host>/cgi-bin/mailman/listinfo/<nombre_lista>

mientras que los archivos de las listas de correo se ubican en:

http://<virtual_host>/pipermail/<nombre_lista>

Publicado el

Instalar fail2ban en Linux

instalar-fail2ban

Esto es opcional pero se recomienda hacerlo debido a que el Monitor de ISPConfig busca mostrar sus logs:

yum -y install iptables-services fail2ban fail2ban-systemd
systemctl stop firewalld.service
systemctl mask firewalld.service
systemctl disable firewalld.service
systemctl stop firewalld.service

A continuación creamos el archivo /etc/fail2ban/jail.local y activamos la supervisión para el servicio ssh, email y ftp.

nano /etc/fail2ban/jail.local

Agregue el siguiente contenido al archivo jail.local:

[sshd]
enabled = true
action = iptables[name=sshd, port=ssh, protocol=tcp]

[pure-ftpd]
enabled = true
action = iptables[name=FTP, port=ftp, protocol=tcp]
maxretry = 3

[dovecot]
enabled = true
action = iptables-multiport[name=dovecot, port="pop3,pop3s,imap,imaps", protocol=tcp]
maxretry = 5

[postfix-sasl]
enabled = true
action = iptables-multiport[name=postfix-sasl, port="smtp,smtps,submission", protocol=tcp]
maxretry = 3

Finalmente se deben crear los enlaces del arranque del sistema e iniciar fail2ban:

mkdir /var/run/fail2ban
systemctl enable fail2ban.service
systemctl start fail2ban.service
Publicado el

Instalar Jailkit en Linux

instalar-jailkit

Jailkit solo es necesario si se quiere hacer chroot a usuarios SSH. Advertencia: En el caso de ser usado DEBE instalarse ANTES que el ISPConfig o de lo contrario fallará. Puede instalarse con lo siguiente:

cd /tmp
wget http://olivier.sessink.nl/jailkit/jailkit-2.19.tar.gz
tar xvfz jailkit-2.19.tar.gz
cd jailkit-2.19
./configure
make
make install
cd ..
rm -rf jailkit-2.19*
Publicado el

Instalar Webalizer, y AWStats en Linux

Instalar-Webalizer-y-AWStats

Webalizer, y AWStats pueden instalarse con lo siguiente:

yum -y install webalizer awstats perl-DateTime-Format-HTTP perl-DateTime-Format-Builder

Edite el archivo /etc/httpd/conf.d/awstats.conf:

nano /etc/httpd/conf.d/awstats.conf

Y cambiar la línea:

Require local

a:

Require all granted

Y reiniciamos apache:

systemctl restart httpd.service
Publicado el

Instalar BIND en Linux

instalar-bind

BIND puede instalarse con lo siguiente:

yum -y install bind bind-utils haveged

Realice una copia de seguridad del archivo existente /etc/named.conf y cree uno nuevo de la siguiente manera:

cp /etc/named.conf /etc/named.conf_bak
cat /dev/null > /etc/named.conf
nano /etc/named.conf

El archivo debería quedar de la siguiente forma:

//
// named.conf
//
// Provided by Red Hat bind package to configure the ISC BIND named(8) DNS
// server as a caching only nameserver (as a localhost DNS resolver only).
//
// See /usr/share/doc/bind*/sample/ for example named configuration files.
//
options {
        listen-on port 53 { any; };
        listen-on-v6 port 53 { any; };
        directory       "/var/named";
        dump-file       "/var/named/data/cache_dump.db";
        statistics-file "/var/named/data/named_stats.txt";
        memstatistics-file "/var/named/data/named_mem_stats.txt";
        allow-query     { any; };
                allow-recursion {"none";};
        recursion no;
};
logging {
        channel default_debug {
                file "data/named.run";
                severity dynamic;
        };
};
zone "." IN {
        type hint;
        file "named.ca";
};
include "/etc/named.conf.local";

Cree el archivo /etc/named.conf.local que se incluye al final de /etc/named.conf (/etc/named.conf.local posteriormente se rellenará con ISPConfig si crea zonas DNS en ISPConfig):

touch /etc/named.conf.local

Luego creamos los enlaces de inicio y arrancamos BIND:

systemctl enable named.service
systemctl start named.service
systemctl enable haveged.service
systemctl start haveged.service
Publicado el

Instalar PureFTP

instalar-pureftp

PureFTP puede instalarse con lo siguiente:

yum -y install pure-ftpd

Luego se deben agregar los enlaces para el arranque del sistema e iniciar PureFTP:

systemctl enable pure-ftpd.service
systemctl start pure-ftpd.service

Ahora debemos configurarlo para que acepte sesiones FTP y TLS. FTP es un protocolo muy inseguro porque sus usuarios y contraseñas se transmiten en texto plano. Al usar TLS la comunicación completa es cifrada haciéndolo más seguro.

OpenSSL se requiere para que funcione TLS por lo que para instalarlo ejecutamos:

yum install openssl

Ahora debemos activar TLS en PureFTP, para ello editamos su configuración y lo colocamos en 1:

nano /etc/pure-ftpd/pure-ftpd.conf

y nos aseguramos que TSL este en 1 de la siguiente forma:

[...]
# This option can accept three values :
# 0 : disable SSL/TLS encryption layer (default).
# 1 : accept both traditional and encrypted sessions.
# 2 : refuse connections that don't use SSL/TLS security mechanisms,
#     including anonymous sessions.
# Do _not_ uncomment this blindly. Be sure that :
# 1) Your server has been compiled with SSL/TLS support (--with-tls),
# 2) A valid certificate is in place,
# 3) Only compatible clients will log in.

TLS                      1
[...]

Para poder usar TLS debemos crear un certificado SSL con lo cual primero creamos el directorio:

mkdir /etc/ssl/private/

Ahora podemos crear el certificado SSL ejecutando:

openssl req -x509 -nodes -days 7300 -newkey rsa:2048 -keyout /etc/ssl/private/pure-ftpd.pem -out /etc/ssl/private/pure-ftpd.pem

Esto preguntará algunos parámetros a los cuales debemos responder lo siguiente:

 Country Name (2 letter code) [XX]: SIGLAS DEL PAIS
 State or Province Name (full name) []: NOMBRE DEL ESTADO
 Locality Name (eg, city) [Default City]: NOMBRE DE LA CIUDAD
 Organization Name (eg, company) [Default Company Ltd]: NOMBRE DE LA EMPRESA
 Organizational Unit Name (eg, section) []: NOMBRE DEL DEPARTAMENTO
 Common Name (eg, your name or your servers hostname) []: desarrollo1
 Email Address []: EMAIL DEL RESPONSABLE DEL SERVIDOR

Ahora debemos cambiar los permisos al certificado con:

chmod 600 /etc/ssl/private/pure-ftpd.pem

Y finalmente debemos reiniciar el PureFTP:

systemctl restart pure-ftpd.service

Eso es todo. Ahora puede intentar conectarse usando su cliente FTP; Sin embargo, debe configurar su cliente de FTP para que utilice TLS.

Publicado el

Instalar mod_python

instalar-mod-python

El módulo apache mod_python no está disponible como paquete RPM, por lo tanto lo compilaremos desde el origen. El primer paso es instalar los archivos de desarrollo de python y descargar la versión actual de mod_python como archivo tar.gz, para esto ejecutamos los siguientes comandos

yum -y install python-devel

cd /usr/local/src/
wget http://dist.modpython.org/dist/mod_python-3.5.0.tgz
tar xfz mod_python-3.5.0.tgz
cd mod_python-3.5.0

Y luego configurar y compilar el módulo.

./configure
make

Hay un error en el módulo compilado que hará que la instalación falle con el error “version =”fatal: Not a git repository (or any of the parent directories): .git”. Para arreglarlo, ejecute este comando sed en una sola línea.

sed -e 's/(git describe --always)/(git describe --always 2>\/dev\/null)/g' -e 's/`git describe --always`/`git describe --always 2>\/dev\/null`/g' -i $( find . -type f -name Makefile\* -o -name version.sh )

A continuación, instale el módulo con este comando.

make install

Y habilite el módulo en Apache:

echo 'LoadModule python_module modules/mod_python.so' > /etc/httpd/conf.modules.d/10-python.conf
systemctl restart httpd.service